If you use the same QuickBooks Invoice template from before you used Fishbowl Inventory then you know that in your item column it says "FB_Item."
Now if you are like me, and don't like "FB_Item" on your invoices and would rather have a better looking invoice for your customers. Here's how to fix it!
Getting Started: In Fishbowl Inventory
First, you'll need to edit the following settings in Fishbowl Inventory. Click the Accounting tab at the top bar and select Accounting Integration. Click on Tools and select Module Options. In the General Tab, uncheck the boxes under Invoice Item's Description:
-
Prefix with PRoduct Number
-
Append Product UOM
In the same Module Options menu click the QuickBooks tab. You'll need to set the "Other1" field in the custom invoice item's section to Number. Set the "Other2" field to UOM Abbreviation.

Exit out of the Module Options window by clicking the OK button. In the top left section of the Accounting Integration click the Export Icon.
Next Steps: In QuickBooks
Bring over the QuickBooks Homepage window front and center. Click the Create Invoices icon from the QuickBooks Homepage. In the Create Invoices window, ensure "Intuit Product Invoice" is selected as the desired template. If not selected you can do so by clicking on the drop-down arrow next to Template(located in the light blue bar at the top with the labels: Customer Job, Class, Template).
Edit the Product Invoice Template
Return to the QuickBooks Homepage. In the upper menu bar, select List and click on Templates. Once in the Templates window, right click on Intuit Product Invoice and select Edit Template.
The Basic Customization window will open, click the Manage Templates button. Create a copy of the Intuit Product Invoice template before customizing your template by clicking Copy button at the bottom of the Manage Templates window. Rename the template as "Fishbowl Product Invoice" save the changes by clicking OK.
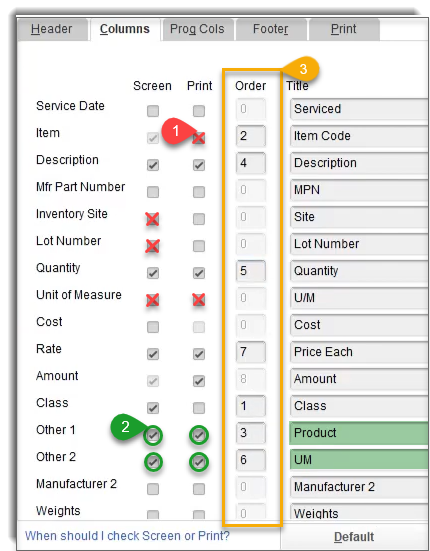
You'll return to the Basic Customization window. Click Additional Customization button at the bottom of the window. Navigate to the tabs section and select the Columns tab. You'll see Screen, Print Tab, Order, Title at the top of the Columns tab. At the left of the columns tab you'll see the Column Labels.

Step 1: For each column label provided, uncheck the Screen or Print box:
- Item: unckeck Print
- Inventory Site: uncheck Screen
- Lot Number: uncheck Screen
-
Unit of Measure: uncheck Screen and Print
Step 2: Next, you'll need to check both boxes next to Other1 and title it "Product". Check both Boxes for Other2 and title it "UM".
Step 3: Lastly, Change the number order of the columns:
-
Item: 2
-
Description: 4
-
Inventory Site: 0
-
Lot Number: 0
-
Quantity: 5
-
Unit of Measure: 0
-
Rate: 7
-
Amount: 8
-
Class: 1
-
Other 1: 3
-
Other 2: 6
Click the OK button to save your changes.
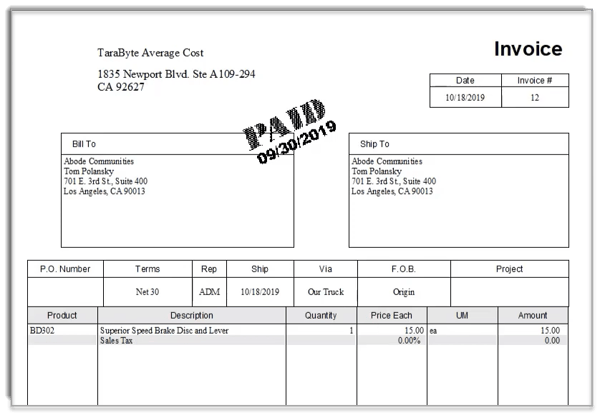
The new Pretty QuickBooks Invoice
To view your new Pretty QuickBooks invoice, return to the Create Invoice window. Click the Print Icon button at the top of the window and click the Preview button.

You have now successfully removed "FB_Item" from your QuickBooks Invoices. If you would like to customize more of the layout or design of your Invoice, you can return back to the Additional Customization Window.

.png)
